


Faking It: Metering Light to Get the Film Look in Video
Written by Peter Bohush | Posted by: Anonymous
If you’re trying to create the look of film with digital video, setting the proper light levels is critical to creating the balance of light, shadow, and contrast that film provides. The DV cinematographer benefits from following film lighting techniques and using a light meter to measure the quality of light being recorded.
With film, lighting is measured according to the speed of the film itself. The lens and light work together to bring the appropriate image onto the film’s emulsion. With video, the videotape itself has no light or speed rating. It’s the camera which controls how light is recorded by the CCDs onto the tape.
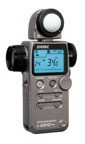
Light meters are read according to settings based on the speed of the film being used. For example, a cinematographer can point a meter and know how the light going to the camera will reproduce on film because the meter reads F4 and is set to the film’s speed of 200 ISO. To use a light meter in video, you have to know the camcorder’s speed rating (measured in lux) and calculate that to an ISO (formerly called ASA) film speed rating.
According to Tom Musto, a well-known lighting instructor and DP/director based in Wilkes-Barre, Pennsylvania, "The best way to achieve a film look is to set your lighting and ratios using a meter. Then you’ll know that the ratios will be right no matter what the setting of the camera." Musto offers lighting classes around the country; more information is available at www.videolightingclass.com.
Most professional video camcorders have published lux ratings, so it’s easy to calibrate light meters. Popular prosumer digital video models often don’t, however.
"Using the smaller cameras with a light meter is tough, because some of the F-stop settings on the palm-size cameras do not coincide with F-stop settings on larger cameras and meters," said Musto. "Basically, some DV cameras have their own F-stop systems which are not consistent with the rest of the world."
The work-around is to calibrate your light meter to your camcorder. This involves lighting a gray card and setting your meter to match the F-stop reading from your camcorder, as follows:
1. Purchase an 18 percent gray card, manufactured by Kodak and available online or at most photography stores.
2. Light the gray card with a flat light (no shadows.) Take an F-stop reading from your camcorder’s built-in meter. Make sure that the exposure is set to 0 dB gain.
3. Using the camcorder’s F-stop as a reference, set your light meter so it reads the same F-stop at 1/60th second, or 30 fps.
4. Note the meter’s ISO reading. This becomes your camcorder’s ISO number.
5. To use your light meter on your shoot, lock it to the camcorder’s ISO number and take readings relative to that setting.
When lighting for digital video, a contrast range of about 4-to-1 (two F-stops either above or below the key light level) will yield accpetable video picture.
Musto achieves a film look by keying his subjects at F4 or F5.6 and lighting the shadows to fall within his two stop limits. "If my key light reads 5.6, that is the highlight," said Musto. "The shadow should read F2.8 to be two stops darker. Always begin with the desired highlight reading and work your ratio with the shadow area."
Of course, Musto and other DP’s stress that one can’t simply light by mathematics. Personal style and the requirements of the project are the starting points for lighting any scene. But following standard lighting rules and ensuring the light falls within acceptable ranges using a light meter are the basics upon which artistry in lighting is built.